Jump to Content
Abrigo APIs
GuidesRecipesChangelog
Abrigo APIs
Guides
GuidesRecipesChangelog

Getting Started

  • Welcome 👋
  • Generate API Keys
  • Authentication
  • Available Scopes
  • Errors
  • Events
  • Webhooks
    • Technical User Guide

Use Cases

  • CRM Integration
    • Send Data to Sageworks
    • Send Data to a CRM
    • CRM Integration with Dynamic Application
  • Documents
    • Get Document Information
    • Post Documents
  • Industry Financial Data
    • Get Financial Ratios
    • Available Metrics
  • Workflow Automation
    • Start Workflows
    • Track Workflow Tasks
    • Update Workflow Steps
  • Loan Decisioning
    • Underwriting Metrics
    • Industry Content
  • Loan Boarding
    • Boarding Loans
  • Online Portal Now Authentication
    • Launch Online Portal Now
  • Collateral Widget
    • Enable a Collateral Widget
    • Create Collateral Widget
      • Example UDF creation
    • Retrieving Customer Entered Info
  • Customer Widget
    • Enable a Customer Widget
    • Create a Customer Widget
    • Retrieving Customer Widget Orders
  • Abrigo Fraud Detection
    • Payment Fraud Decision API
      • Send Payment Transaction Details
      • Receive Fraud Decision Status

SuPPORt

  • Contact Support
  • Frequently Asked Questions
  • Feedback

Enable a Collateral Widget

Suggest Edits

Users may enable existing collateral widgets using the following steps:

  1. Navigate to the Third-Party Connections page
  2. Add a new API client on the Abrigo APIs page and select the Name, Permission, and Official Partner Integration and save the client ID and secret.
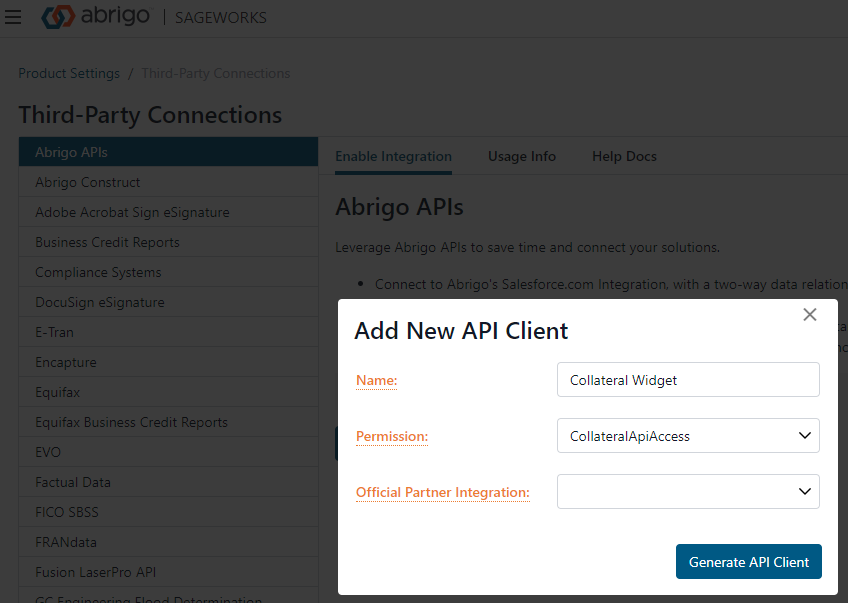
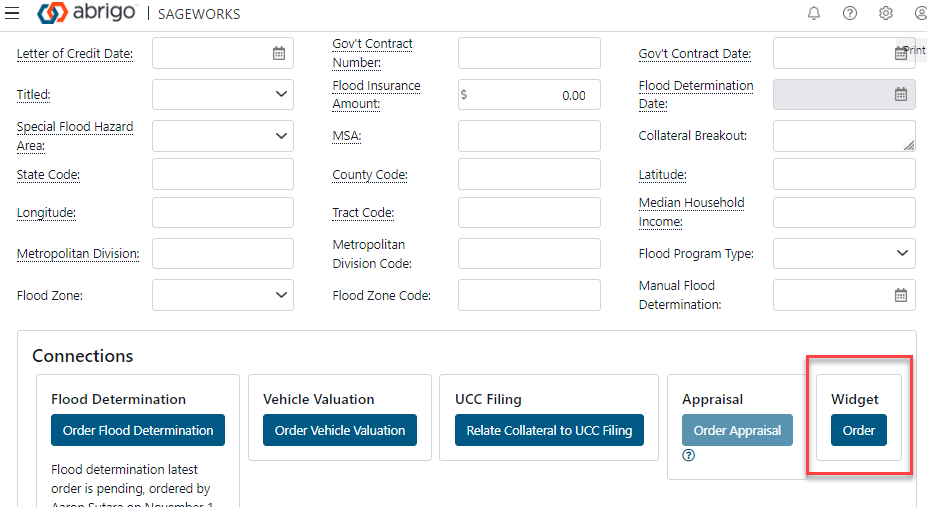
  3. Communicate the client ID and secret to our partner. They will use that information to make a POST request which will generate a new button on the collateral page with the fields their service requires.

Updated about 1 year ago